Project 2: Hierarchical Website with Navigation
Goal
Learn how link web pages and use a central stylesheet to create a unified website.
Overview
Starting with the files you created in project 1, create additional web pages, organize them into a folder hierarchy, connect them via a main navigation menu, and add a linked stylesheet with some basic CSS decorations.
Deliverables and Due Date
Always check the schedule for due dates. Projects are always due by midnight on the scheduled due date.
Create a zip file of your project2 folder and submit via Blackboard.
Getting Started
Create a folder called project2 and copy the three files you created from project1 (index.html, resume.html, and courses.html). This is important because you will always have your project1 files in case you accidentally delete, overwrite, or mess-up your project2 work.
Inside of your project2 folder, create two sub-folders, one called examples and one called gallery.
Examples
The examples folder will contain some examples that demonstrate HTML expertise. For this project, we will create two examples and an index page describing the examples.
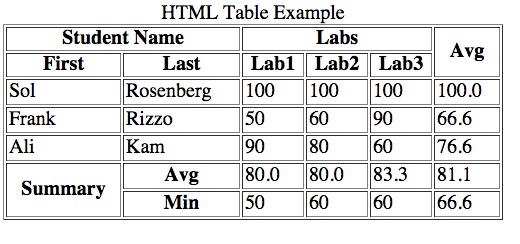
Table Example (10 points)
- Inside of examples, create a file called table.html with the required HTML5 markup. All your web pages should validate as HTML5.
- Markup the table content below with these tags:
table,tr,th,td,thead,tfoot,tbodyandcaption. - Be sure to properly use the HTML attributes
colspanandrowspanfor cells that obviously span multiple cells, i.e., Student Name, Labs, Avg, and Summary. Notice that the table has two header rows, three body/content rows and two footer rows, so you should use the most appropriate tags to identify these areas.
Form Example (20 points)
- Inside of examples, create a file called form.html with the required HTML5 markup.
- Use these tags to create the form shown below:
form,input,select,option,fieldset,labelandlegend.

- Be sure to properly use the HTML attribute
typeto create the appropriateinputelements.- Username and Hometown should be type "text"
- Password should be type "password"
- Use type "checkbox" for each of the Interests
- Use type "range" to create the competitive sleeping slider
- Use type "radio" for each of the classes, i.e., Freshman, Sophomore, etc.
- The graduation year should be implemented with a select-option menu, i.e.,
selectandoptiontags. - Use the
labelandfieldsetappropriately. See the textbook for details on the proper usages.
Index Page for Examples (5 points)
In the examples folder, create a page called index.html with the required HTML5 tags. The page should have a title and h1 with the content "HTML Examples" and it should contain hyperlinks to
the three examples (Table, Form and Photo Gallery) as well as a description of each example, i.e., what does each example demonstrate.
Photo Gallery (25 points)
- Inside of the gallery folder, create at least three photo pages with the file names photo1.html, photo2.html, etc.
- Each photo page should include an image (
img), a heading title (h2) for the image, and a short description (use theptag with the class name "image_caption"). Be sure to add relevant and appropriate content for the h2 and a paragraph that describe the image. Select pictures that interest you or pictures that you might have taken yourself. Keep in mind that this emerging website is something you can show future employers to demonstrate your web design skills. Eventually, it will be impressive. - You must appear in at least one photo on this page.
- Inside of the gallery folder, create a page called index.html with the required HTML5 tags. The page should have a
titleandh1with the content "Photo Gallery" and it should contain smaller versions of the images in each of your photo pages (called thumbnails). Each thumbnail should be a hyperlink to the corresponding photo page.
Points will be given based on the overall quality of your work in this section.
Website Navigation (20 points)
Create a navigation menu as follows:
- In your homepage (project2/index.html), add a
navelement, i.e.,<nav> </nav>. Put thenavinside yourheadertag and right above your name, which should be in anh1orh2tag. - Inside the
navelement add a nested unordered list that matches the folder hierarchy of your emerging website. Your main list should have items that link to the following pages:index.html (Home) resume.html (Resume) courses.html (Courses) examples/index.html (Examples) gallery/index.html (Photo Gallery)
Use the page name in parenthesis as the item text and then make that text a hyperlink to the corresponding URLs. For example:<li><a href="resume.html">Resume</a></li> - The Examples item should have a nested unordered list with links to the following pages
examples/table.html (Table)
examples/form.html (Form)
- The Gallery item should have a nested unordered list with links all your photo pages
gallery/photo1.html (Photo 1)
gallery/photo2.html (Photo 2)
gallery/photo3.html (Photo 3)
etc.
- Test your hyperlinks on your homepage and be sure that your navigation menu works. Then, copy this navigation menu to the top of all your pages. Note that you will NOT have to change the relative URLS when you copy the navigation menu to your Resume (resume.html) and Courses (courses.html) files. However, when you copy the menu to pages in your examples and gallery sub-folders, you will have adjust the relative URLS to account for the fact that these pages are all in sub-folders.
Linked Stylesheet (20 points)
In your project2 folder, create a file called index.css and add the following code:
nav, nav ul, nav li{
	margin:0;
	padding:0;
}
nav ul{
	list-style:none;
	float:left;
	width:100%;
}
nav ul li{
	float:left;
	position:relative;
}
nav ul a{
	display:block;
	padding:6px 32px;
	color:#000;
	background:#ccc;
	text-decoration:none;
	border-bottom: 2px solid black;
}
nav ul ul{
	background:#fff;
	position:absolute;
	left:-9999px;
}
nav ul ul li{
	float:none;
}
nav ul li:hover ul{
	left:0;
}
nav ul li:hover a{
	background:#888;
}
nav ul li:hover ul li a:hover{
	color:#fff;
	background:#444;
}
This code will format all your navigation menu horizontally with drop downs for each sub-menu.
In the head of all your web pages, add the link tag with the proper attributes so that index.css is used to style each page. Consider that some of your pages are stored in sub-folders, so be sure to use the correct relative URL to link index.css from ALL of your pages:
- index.html
- resume.html
- courses.html
- examples/index.html
- examples/table.html
- examples/form.html
- gallery/index.html
- gallery/photo1.html
- gallery/photo2.html
- gallery/photo3.html
After you are sure that the style sheet is being properly linked on all your web pages, add selectors and properties to decorate your pages. At a minimum, you should add at least one CSS property to the following tags:
p,
header,
footer,
h1,
h2,
table,
th and
td.
At a minimum, you should demonstrate the proper usage of the following CSS properties:
font-family,
font-size,
color,
background-color,
text-decoration and
text-transform
Points will be given based on the quantity of your CSS code and the quality of your designs. Your designs do not have to be artistic/creative, they just need to be consistent and original, i.e., do not just copy styles shown in class.